Showing posts with label White. Show all posts

Thursday, June 4, 2015

ADDING CORBELS FOR ARCHITECTURE INTEREST !

Good morning all !

Our last house had the most amazing architectural interest - with moldings and rosettes and cherubs ( 4 of them in each corner of the entrance way ) and corbels - all original to the 100 year old building and all in plaster.

interior architectural details

It was what sold me on that place ( along with the original exposed brick walls )  and I miss them.  You can see more HERE

This house has none of that...............but that doesn't mean it can't be added.
We have a small archway - and I was only able to put one on one side ( the other side is a pony wall )
but just the one makes all the difference ( I still have to touch the paint up on the sides ) 


I bought this piece from Amazon - for much cheaper than it was at Home Depot actually
I think it cost 15.00 or so..............
It's made from a high density urethane -
Wood ones are very expensive - and not necessary if you plan on painting them anyway.

painted white corbel on wall

Because it's made from urethane I was able to hang it up with just No More Nails.............it's light enough that it just stayed in place until it dried.

Urethane Corbel

And then John caulked all around the perimeters - making it look seamless.
It looks more striking at night - when the grey wall appears a deeper shade.


It's no plastered cherub ..................but it'll do - once we add the crown molding - it'll definitely do
And it adds far more than 15 dollars in value to a room !

Painted white corbel


Have a great Thursday  ♥

Hugs,
Me


LOOKING FOR INSPIRATION?
JOIN ME AT THESE FABULOUS PARTIES !

FRENCH COUNTRY COTTAGE                                 THE SHABBY ART BOUTIQUE
MY TURN FOR US                                                       MY ROMANTIC HOME
THE SHABBY NEST                                                     VINTAGE PAINT & MORE
LIFE ON LAKESHORE DRIVE                                    IT'S OVERFLOWING
I SHOULD BE MOPPING THE FLOOR                      THAT'S WHAT CHE SAID
DWELLINGS THE HEART OF YOUR HOME            ART IS BEAUTY
BETWEEN NAPS ON THE PORCH                            COASTAL CHARM
MY UNCOMMON SLICE OF SUBURBIA                 CONFESSIONS OF A PLATE ADDICT
AN EXTRAORDINARY DAY                                      KATHE WITH AN E
YESTERFOOD - TREASURE BOX TUESDAY           THE DIY DREAMER
SAVVY SOUTHERN STYLE                                       SEW CRAFTY ANGEL
FLUSTER BUSTER                                                       MY SALVAGED TREASURES
NO MINIMALIST HERE                                              I GOTTA CREATE
CHIC BY TAB                                                               FEEDING BIG
ANDERSON & GRANT

Friday, October 31, 2014

Creating a bed nook.....( and overcoming obstacles )


DIY bed nook


John says - This is absolutely ridiculous -
John says - This is STUPID
John says - The room's too small - this is ridiculous
Suzan says - You already said that
John says - I can't believe you're hanging a curtain there - the room's small enough - this is absolutely ridiculous

3 times............................

GET.  OUT.  OF. THE.  ROOM.  PLEASE...................................
Obstacle no. 1 taken care of.
_________________________________________________________________________________

Now for the second one and this is huge - we couldn't get the box spring upstairs.
For the first guest room we were able to cut the box spring and fold it in half since it was a spring ( coiled ) one.
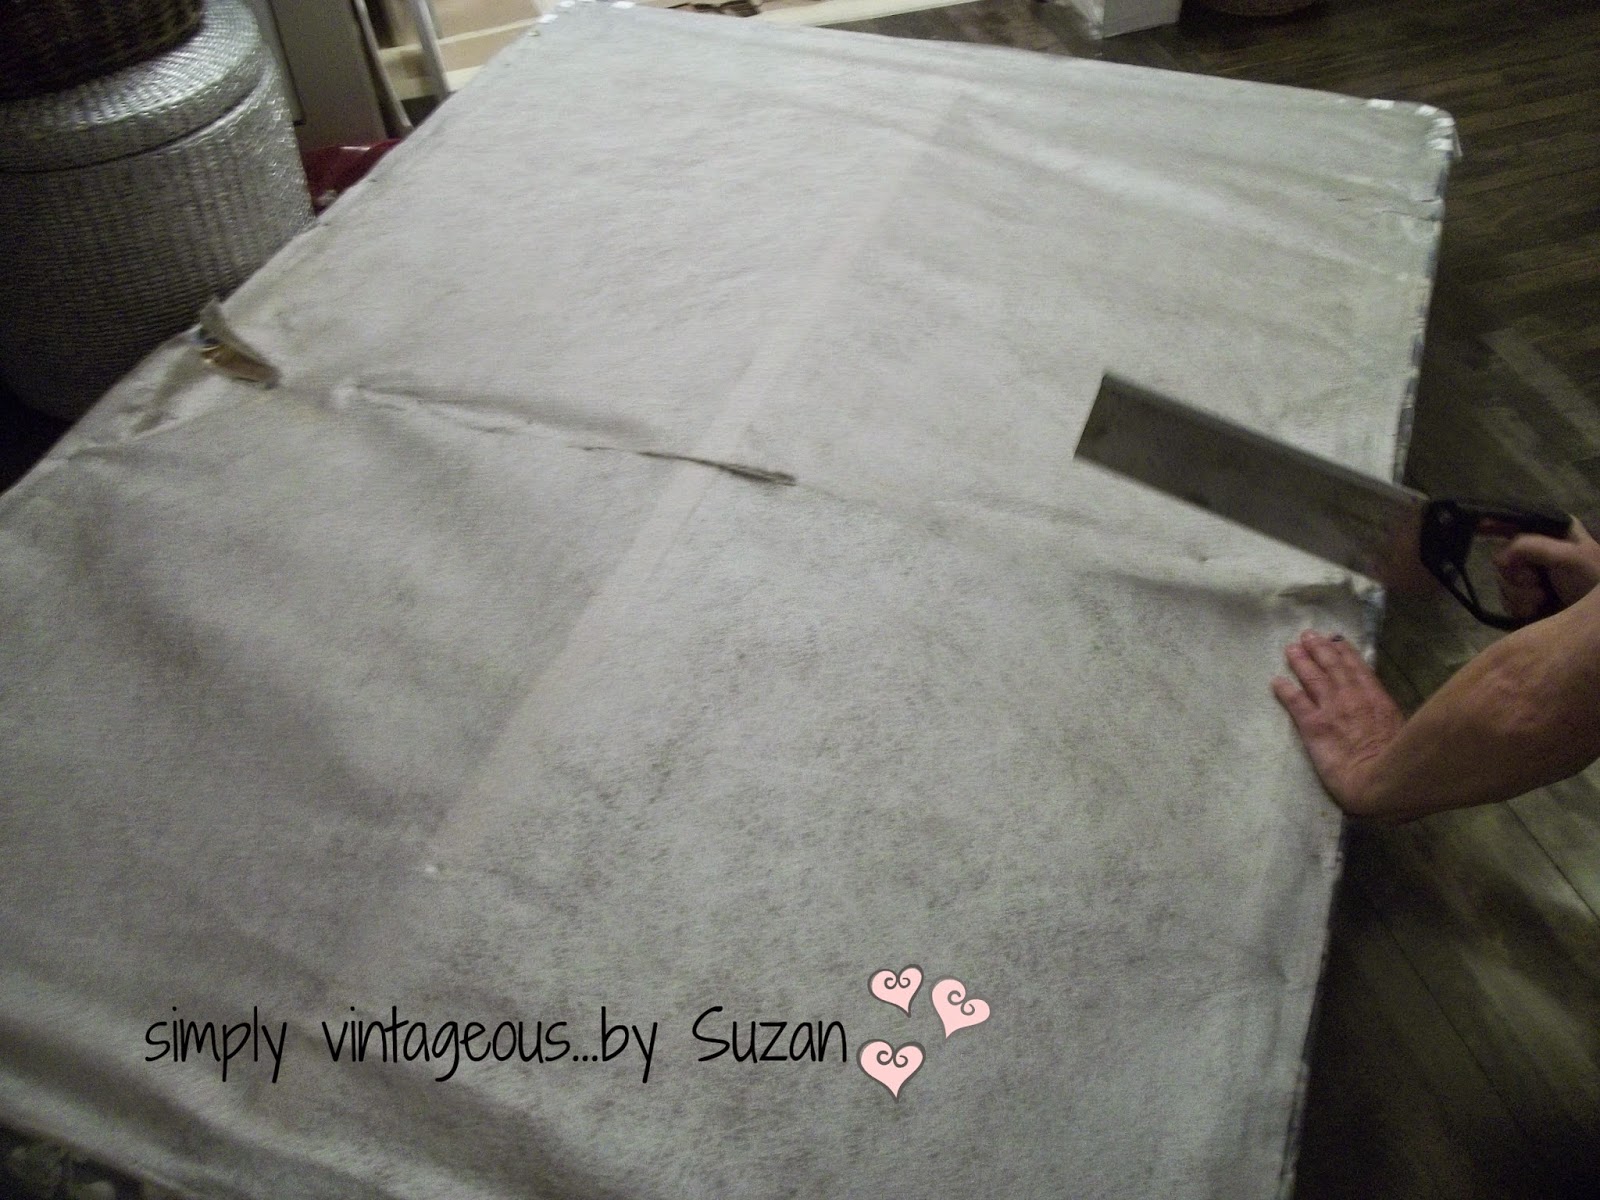
Assuming this would be the same, John began sawing away
( Yep - right through the gauze - don't ask - we had plenty to fight about last night - this didn't seem worth it at all )


You cut the 3 main pieces of frame like this


and then simply fold it over

John says - There's nothing " simple " about this
John says - I don't know anyone else on this earth that does this crap
Suzan says - Trust me - people do this - in fact a lot of people do this that live in little old houses
John says - WHY COULDN'T WE JUST PUT A SINGLE BED IN THERE FOR GOD'S SAKES?
Suzan says - Because a double fits in and I want to create a nook

Except -

Suzan says - Oh oh - there's no springs - we can't fold it in half because of all the wood slats
John says - Oh well - there goes that idea - we'll get a single bed - and he gets up to walk away
Suzan says - No way, Jose, we'll just cut the entire thing in half and then re-attach it upstairs - in place
John says - WHAT DO YOU MEAN  " WE'LL " JUST CUT IT IN HALF?
John says - I only see one of us with a saw in his hands
John says - I'm really at the end of my rope with all of your sick ideas
Suzan says - THEY'RE NOT SICK IDEAS !!!!!!!!!!
John yells - WHAT THE HELL ARE YOU DOING NOW?
Suzan says - taking all the fabric off to one side so you can remove those slats...............it'll be easier for you that way, trust me
John says - EASIER FOR ME????????????????????


They were just stapled in - so they were in fact quite easy to come off - here it is with all the horizontal slats removed


John says - THIS IS THE LAST TIME - DO YOU HEAR ME - I'M NOT DOING CRAP LIKE THIS ANYMORE
Suzan says - Aw c'mon - you just have to saw the 3 main piece of wood now and it's done

Here's how it looked when it was done

John says - I BASICALLY HAVE TO REBUILD THE BLOODY THING UPSTAIRS NOW
Suzan says - Could you please stop shouting?  You're giving me a headache
John says - YOU ARE A HEADACHE


It was incredibly light to carry upstairs LOL

We placed it on the bed frame and John reinforced where the 3 cuts were made


and then he nailed the slats back in ( I patched up where the fabric had been cut )
I only kept the fabric on the sides since the mattress is going to hide everything else..................everything else was cut up and thrown out

Obstacle no. 2 taken care of


A bed skirt would have been difficult - ( plus I didn't have one LOL ) so I cut up a drop cloth - folded it in half - and stapled it along the edge of the slats


Obstacle no. 3 - done !
And there you have it -
By hook or by crook - I've we've created a nook !!!

DIY bed nook

This tiny little space took me over a week - not the room - just the nook - so that's all you're going to see
( and by the way the entire room is basically double the size of this -

The " curtain " is a duvet cover I had on hand ( you can see that post HERE )
Did you notice that little window?
I put the matching pillow case on it - I can fold it to whatever size I need ( shorter in the day ) again I didn't cut the sham at all - just simply folded it - the top part of the window only shows roof lines and tree tops so I didn't think it was necessary to cover that part ( unless there's a chimney sweep in the area, it's perfectly safe)
 I also painted a frame around the window to give it a little more substance


It's not easy getting photos of this small area, let me tell you but I'm going to do my best to show you
" around " lol

I added a mirror to my wood plank " glam " frame - and installed 2 reading lamps on the wall -


A picture of the Eiffel Tower - and benches that I actually used to read on once upon a time !!!
( and fell asleep on one sunny beautiful afternoon )


The mirror is painted white and distressed ( a long long time ago )

And I guess that's kind of it .................almost ready


DIY bed nook

but not quite


John says - Why do you always work a$$ backwards?
Suzan says - I don't !!!
John says - You've decorated half the room - and you still have to paint the floor on the other side
Suzan says - It gives me hope when I can look up and see the other half done

He doesn't even realize I've only painted half the ceiling also LMHO

Oh and here's the seller's photo from MLS and how it looked when we visited the house


Later on in bed...................

Suzan says - Maybe our next place should be a loft
Suzan says - You're becoming quite the carpenter you know
John says - The next time I move it'll be in a pine box
John says - In fact - that may be the next project I work on.....................

Have a wonderful day everyone - and weekend for that matter.
I'm praying I'm finished this room by the end of it -
Please don't let it take another week

Much love,
Me 

Looking for inspiration?
Join me at these fabulous parties !

Be Different Act Normal                                              One More Time Events
Life on Lakeshore Drive                                               It's Overflowing
DIY Showoff                                                               I Should be Mopping the Floor
Uncommon Design                                                       My 1929 Charmer
Distressed Donna Down Under                                    Between Naps on the Porch
An Extraordinary Day                                                  Kathe with an E
Homestories A to Z                                                     Elizabeth & Co.
The DIY Dreamer                                                       Savvy Southern Style
Beyond the Picket Fence                                             Adorned From Above
DIY by Design                                                            Have a Daily Cup of Mrs. Olson
The Dedicated House                                                  French Country Cottage
The Charm of Home                                                   Too Much Time on My Hands
My Turn for Us                                                           My Romantic Home
Miss Mustard Seed                                                     Remodelaholic
Coastal Charm                                                            A Stroll Thru Life
Stone Gable

Saturday, October 18, 2014

Scroll work and a bed frame

Good morning everyone

Last week I mentioned that I had changed my mind about making the second little room into a dressing room - and had decided instead to go with a second guest room. I showed you some options for bed frames I had found online - none of which I was able to get for one reason or another.................but I did find this one.


It's nothing at all of what I had imagined - but it'll do - and I DO happen to like the curves and  scroll work which will tie in ( kind of, sort of, maybe ? )  with this small dresser I'll be using as a night table

Transferring an image on a dresser

The scrolls were transferred on using a transfer from the The Graphics Fairy and later darkened with a sharpie.....................


It served as my end table in our last place and I was thinking of freshening it up and selling it - now it'll be staying with me a little longer since it's the perfect size for a lamp and a few books.

This is how it looked before

Transferred image on dresser

You can see the tutorial for the transfer  HERE

Meanwhile I haven't stopped painting in that room for 3 days - and it's only going white
( with one deep grey accent wall which you can't see in this photo )
The first 2 coats barely covered - I'm on the 3rd and it's looking a little cleaner now
And as much as I love the little windows I can't tell you what a pain they are to paint !!!
( much scraping involved - I'll just say that - there's paint on the glass panes that I swear to you has to be 50 years old )


This room's the brighter of the 2 guest rooms because it has a small sash window on the other side of as well.................( where the deep grey will go ) and the bed will be placed in a sort of nook on that side ( made to measure almost )

And that's what I've been working on non stop now.....................before moving on to the offce ( and final upstairs room )

I'm determined that it'll be finished before we hit our first year " anniversary " in this place.

The first guest room was done with particular little princesses in mind


You can see it HERE - but this one's going to be all grown up - not fluffy at all
All white - with black accents ( much like my room now that I think of it )


Before and after my room is HERE

Okay - gotta run before the paint dries on the roller ( AND I change my mind about the whole thing again )

Come, let's scroll  ♪
Scroll across the floor
Come, let's scro oh oh ll  ♪♫
Scroll across the floor
Now turn around baby.......................

Let's scroll once more   ♪♫♪


Have a wonderful day everyone -
Much love
Me

Looking for inspiration?  Join me at these fabulous parties !

I Should be Mopping the Floor                                 Between Naps on the Porch
Coastal Charm                                                           Sand & Sisal
A Stroll Thru Life                                                      Cedar Hill Farm House
An Extraordinary Day                                               Kathe with an E
The DIY Dreamer                                                    Savvy Southern Style
Beyond the Picket Fence                                          Ginger Snap Crafts   
Adorned From Above                                              Have a Daily Cup of Mrs Olson
Ivy & Elephants                                                From My Front Porch to Yours
My Romantic Home                                                 One More Time Events
Life on Lakeshore Drive                                           My Turn for Us
Miss Mustard Seed                                                  Elizabeth & Co.

Sunday, September 28, 2014

SO close...................................

painted & stencilled floor - paisley pattern

Oh my poor aching knees LOL

Have a wonderful Sunday everyone

Hopefully this will be finished sometime this week to show you all - in the meantime I'll just bore you to death with progress !

More details to come when I'm finally up off my knees and can call this room done

Painted & stencilled floor - paisley design


Much love,
Me

Come check out these fabulous parties - tons of inspiration!

I Should be Mopping the Floor                                Between Naps on the Porch
Coastal Charm                                                          Sand & Sisal
Kathe with an E                                                        An Extraordinary Day
Home Stories A to Z                                                 DIY by Design
Have a Daily Cup of Mrs. Olson                             From my Front Porch to Yours
The Charm of Home                                                French Country Cottage
My Turn For Us                                                       My Romantic Home
The Shabby Nest                                                      Knick of Time
Ginger Snap Crafts                                                  The Dedicated House
I Gotta Create                                                           Remodelaholic
The Girl Creative                                                      Life on Lakeshore Drive
A Stroll Thru Life                                                     Cedar Hill Farm House

Tuesday, August 12, 2014

A PAINTED CUCKOO CLOCK !


Hi Everyone !

I've been wanting a cuckoo clock for the little guest room but these things are very expensive!!!

Upwards of 200.00 ( and very upwards in a lot of cases ) 
I didn't need a fancy one - I didn't even need a wood one for that matter - so when I came across this on Amazon I jumped on it !


Because I figured that within an hour or so of receiving it - it would look like this !


I knew it would look very plastic-y in the dark brown - and it did - it looked like someone dipped it in chocolate actually - mmmm - an Easter chocolate cuckoo clock 


I taped up the mechanisms


Stuck a plastic glass over the clock parts - 


and spray painted the entire thing - chains and all with white primer


I then gave it a coat of ASCP Pure White chalk paint because I wanted to give it a little texture - however once I removed the glass I really didn't like the brown plastic ( had it been black I would have left it ) so I painted over the entire clock face as well
I'll stencil in the numbers one night this week - but for now I painted the little doors in ASCP Antoinette - shabby doors  ( the paint is still wet in this next photo )


and I carefully - very carefully - painted the clock hands too -


and voila - a cute little cuckoo clock for under 30.00  ( I didn't want to take out the battery - so the pendulum is blurry )


Here's the cuckoo ( complete with sound and all )and when I put the numbers on the face I'm actually going to paint the wings blue - crazy I know but I want a blue bird - the wings flap every time it chirps " cuckoo "


John says - Don't tell me we're going to have to listen to that bloody thing every hour
Happiness and sunshine - really he's all about happiness and sunshine.

So the batteries have been removed - but I know what to do now when he drives me crazy

And they will be going back in whenever the little ones are here - I know they'll get a kick out of it.

I certainly do anyway lol


Then I cleaned the paint brush and started on the plank wall - this is just the first step - ASCP French Linen
haphazardly brushing it on - I do NOT want perfection on this wall................and don't worry I'm not going to give you little bits of this every day - I was just so excited that the wall was actually up !
I'll do it all - and then I'll do a tutorial ( it kills me when I say that - ME giving a tutorial is just hilarious )  I want it to look old and weathered and rustic because something quite glamorous will be adorning this wall.
( give to me your leather - take from me my lace )


Oh - and nobody reminded me about my giveaway for reaching a million views !!!
Saw it yesterday - but I think it happened a week ago - sooooo.......................PIORRA MAISON  has agreed to join me in this milestone - stay tuned - I'll let you know all about it on Friday.

And I also just realized that it's Wednesday - I'm supposed to be featuring a house - Oy Vey.................

Have a great one - I HAVE to get back to that wall don't you know !
Much love,

I'll be at these fabulous parties this week - join in if you have something you'd like to share !

I Gotta Create                              From My Front Porch to Yours                    Katherine's Corner
Bloom Design Online                    Ivy & Elephants                                    The Charm of Home
French Country Cottage               Redoux Interiors                                           Shabby Art Boutique
My Turn for Us                            The Shabby Nest                                          Simple Nature Decor
Life on Lakeshore Drive               It's Overflowing                                            Redhead can Decorate
Uncommon Design                       Under the Table & Dreaming                Stone Gable
My Uncommon Slice of Suburbia                                                                     A Stroll Thru Life
Cupcakes & Crinoline          Kathe with an E                                            Home Stories A to Z
Ginger Snap Crafts                      Craft-O-Maniac                                            Glitter Glue & Paint
Savvy Southern Style